
C3 Safety Upgrades
Vette/Jeremy D. Clough | Aug 1, 2012

I learned a lot from my first Corvette, most of it the hard way. First, I learned not to get an "independent" inspection from a shop recommended by the seller. I also learned what it means when the battery box in a '71 shark has been glassed back in, and the U-joints on the adjacent halfshaft don't match. In all fairness, the inspector may not have known what that meant--after all, he didn't know the difference between an LS5 and an LS6, either--but as the buyer, I should have recognized that at some point the car had blown a halfshaft.
This usually happens when a car is under hard acceleration and a U-joint breaks, turning the halfshaft into a nunchaku as centrifugal force spins it at right angles to its usual orientation. In the process, it beats the fool out of the underside of your car, which, on the driver side, includes the fiberglass battery box. While driveshafts don't offer the same hazard as halfshafts when they break, they tend to fall toward the front, digging into the pavement and, on rare occasion, pole vaulting the car. Not good.
The good news is that since these are not unheard-of problems, there are solutions. Safety loops are frequently found on cars that are drag raced, and they're readily available for the C3. Simple in concept, these loops are steel bands that fit around spinning parts such as the halfshafts, and contain them should they break at one end.
When I began the nitrous-oxide installation on my '72 coupe, aka "Scarlett," two issues ago, I also started making plans to put the car on the track. It was then that I remembered the pulverized battery box of my '71. Enter Dragvette Products. Founded by Steve Yates, Dragvette offers safety loops for the both the halfshafts and the main driveshaft for C2, C3, and C4 Corvettes. In keeping with NHRA standards, they're 1/4-inch thick, 1-inch wide, and completely encircle the halfshafts on the '63-'82 models. Since installing the halfshaft loops requires dropping at least one end of the shafts, I decided to replace the U-joints and upgrade the factory U-strap connectors with billet steel caps from Dragvette at the same time.
Installing the rear loops is relatively simple. In fact, it will likely take more time to drop the halfshafts than it will to get the loops in place. Note that there are different configurations for standard and offset trailing arms. In my case, the top of the loop clamps over a folded lip at the top of the (standard) arm, and the bottom is secured on the shock mount. Just make sure you've slipped the loop over the shaft before you put it in place.
Like the halfshaft loops, the driveshaft loop comes in more than one configuration, based on which transmission you have. Since I intend to swap my automatic for a manual six-speed, I went ahead and ordered the one for a longer trans. Again, installation is fairly simple. Disconnect the driveshaft and drop the included bolts through holes in the top of the trans crossmember, then raise the base of the loop upwards, orienting the bolts so they pass through the mounting holes in the base of the loop. The instructions suggest using a heavy rubber band to hold the bolts in place, since they have a tendency to push back up through the crossmember. Tighten the bolts slowly, alternating between them. If you tighten one all the way, it's difficult to keep the other from spinning while you're trying to tighten it. Pulling down on the base of the loop also helps. And be aware that the parking brake cable may be in the way: I had to disconnect mine and re-route it around the loop.
Another thing to remember is that you're dealing with a 40-year-old car. Build standards varied broadly during the C3 generation, a situation sure to be exacerbated by the passage of time. On my car, the crossmember location was off enough that the driveshaft would not clear the loop, which needed to be taller. If you have any doubts about the dimensions on your car, Yates can custom-make loops to match your frame. He can also supply the loops in pieces, so you can weld them up yourself.
In my case, we did the installation at Street Shop in Athens, Alabama, where proprietor Tray Walden quickly cut the welds on the two-piece loop and re-welded it about a half-inch larger. A few sparks and a little black spray paint, and we were back in business.
With the safety pieces in place, the only thing remaining was to replace the grease-able U-joints on the car with solid ones, and put on the billet caps. A classic weakness for Corvette U-joints is that many come with a zerk fitting near where the two cross-shafts meet, meaning there's a hole in one of the places that receives much of the force. Pre-greased solid U-joints eliminate this flaw and are much less likely to break under load. While Yates recommends solid Spicers, constraints of time and availability meant that we went with generic ones. Installing the solid caps that hold them in place simply required a few strokes of a file to ensure that the mounting surface on the other side of the yoke was square. Since the caps are made of 1018 cold-rolled steel, they torque down to 30 pounds, instead of the 15 to 17 pounds of the factory straps.
Something I've learned since the installation is that the bottom of the driveshaft loop has replaced my headers as the lowest part of the car. Considering the heavy, 1/4-inch steel construction of the loop, though, I'd much rather it kiss the speed bumps than my pipes.
Another safety add-on that's required on many tracks is a fire extinguisher. I know the old joke that most Corvette fires actually start with the payment book, but if you haven't had a fuel leak in a shark, you probably haven't driven one very far. So far I've had leaks at the filter, the carb, the return, the pump, and the nitrous solenoid. They happen, and when they happen in a hot place like an engine compartment, fires can happen, too.
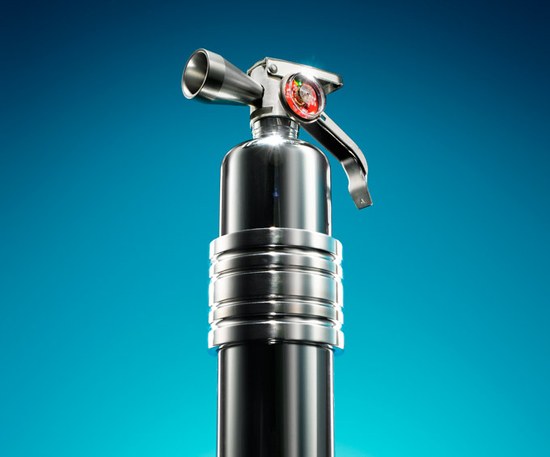
What this means is you need an extinguisher that's designed to combat gasoline fires and mounted within easy reach of the driver seat. For my car, I selected a HalGuard 2.5-pound unit from H3R, a company that specializes in automotive extinguishers. Available from Summit Racing, the HalGuard comes in chrome, red, or black, and in 1.4-, 2.5-, and 5-pound sizes. It uses a "clean agent" (meaning it won't leave a residue) and is non-conductive, so you won't run the risk of frying your electronics when putting out a fire.
Although the HalGuard extinguisher came with a dual-latch, stamped-steel mounting bracket, Summit also carries a billet-aluminum mount that fits on the bottle and slips into a separate bracket (either for a rollbar or a flat surface), where it's held in place with a pull pin. Since I intended to mount it to the front of the passenger seat, I went with the flat-surface bracket.
The round extinguisher mount is slit down one side, so installing it on the bottle requires backing out the two bolts that hold the slit closed and sliding it on. Because extinguisher sizes can vary, the mount also has a jacking screw that can be used to spread it open even farther. Once on, back off the jacking screw, then tighten the other two to clamp it in place.
Installing the mount into the base only requires slipping it into its channel and adjusting the two plastic set screws outwards until there's no slop in the fit. (Make sure the pin still slips easily in and out.) Mount the bracket, adjust the extinguisher in its mount so that it's in the right position, and you're done.
Things were meant to be used, and if you intend to use your Corvette for going fast--which, after all, is what they're designed for--it could well wind up on a track at some point. Adding safety loops and a fire extinguisher is an inexpensive way to increase the odds that you take the same car home.